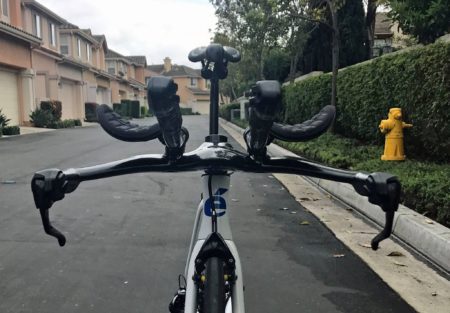
I know this isn’t a “common” wrench job, but I thought I would post my new Cervelo P2 setup for anyone who is trying to do something similar (and to show off some of my “skills”…not to mention something I could do with a broken shoulder). I got a lot of good info from Slowtwitch.com. Here’s the build, routing, and photos. Feel free to ask questions.
Zipp Vuka Stealth Aerobar Setup:
- Shimano Ultegra R671 Di2 bar end shifters
- Shimano 9071 Di2 brake levers/shifters
- 2x Shimano SM-JC41 internal junction boxes (stuffed inside base bar)
- 2x E-Tube wires to connect the to bar end shifters to internal junction boxes
- 1x E-Tube wire to connect the to internal junction boxes together
Bike Setup:
- Shimano Ultegra 6870 front derailleur
- Shimano Ultegra 6870 rear derailleur
- 1x Shimano SM-JC41 internal junction box (stuffed inside seat tube by bottom bracket)
- 1x E-Tube wire to connect junction box from base bar to seat tube port
Seat Tube/Post Setup :
- Shimano EWW01 D-Fly
- Shimano SM-BTR2 internal battery
- Shimano SM-SW90B 5-port external junction box
- 1x Shimano SM-JC41 internal junction box
- 1x E-Tube wire from internal junction box to one near bottom bracket
- 1x E-Tube wire to connect battery to internal junction box
- 1x E-Tube wire to connect D-Fly to internal junction box
- 1x E-Tube wire to connect D-Fly to external junction box
Both the front brake cable and Di2 wire are routed through the bottom hole in the base bar.
I was able to route the rear brake housing through the inside of the top tube. I just had to drill out the plastic cable ports by the steerer and seat post. Pushing the cable through took a bit of effort and trial-and-error, but the rear brake feels good.
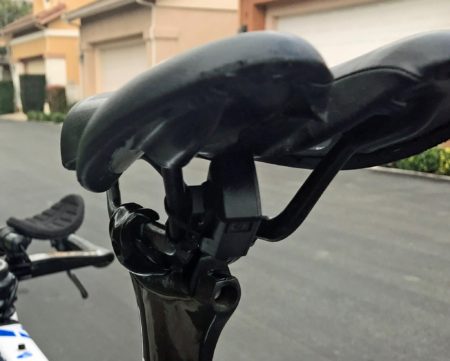
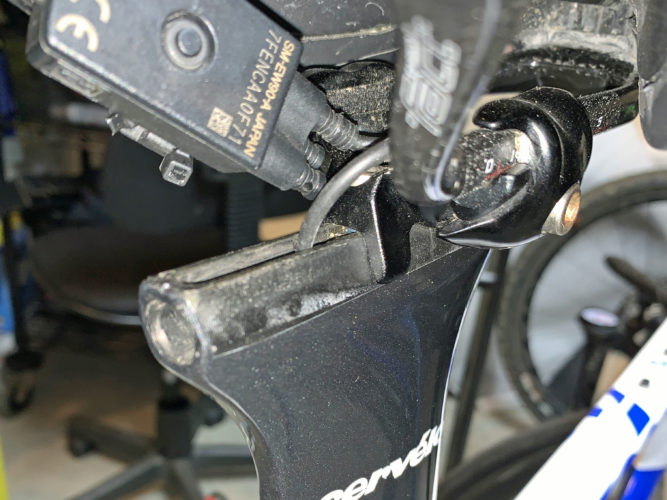
I had to drill one hole in the seat post for the E-Tube wire. I’ve mounted the external junction box with zip ties to the seat rails. I really don’t need rear hydration this time of year, but zip ties are easy to remove and I can reposition the junction box when needed.
When, I get the time I’ll draw up a schematic…![]()
I’ve had a few questions about how and where I drilled a hole in my seatpost for the Di2 wire. Here are a couple of photos that show where. You have to be aware of where you seat post clamp will be positioned. After determining where to put the hole, I used a drill bit about the same size as the Di2 wire head. It took a little effort to push it through when done drilling, but it works well.


Permalink
Hi, great job. Can you plrase share the schema? I guess that ewwo1 is not mandatory and only needed to provide di2 integration via ant or bt? Thanks, Tomas
Permalink
Thanks! You are correct that the EWW01 is not mandatory. It is only for ANT+ integration. Sorry, I don’t have any schematics. I tried to describe as best as I could in my post. Once you start wiring it, it’s not too hard to figure out. The hardest part is having to rewire things is you need to change the pad/extension position. I just had to do this after I got a new fit.
Permalink
Would you mind e mailing pic’s of how big a hole you drilled and where? Doing the same so really appreciate the help.
Permalink
I just updated the post to show where I drilled the hole for the Di2 wire. Good luck!